(FOR CONTENT PROVIDERS) A practical guide to the Edovo Editor: How to build, preview, edit and publish active content
Learn how to build, preview, edit, and publish courses and interactive resources onto Edovo
Wondering, “Do I need to be a coder to use the Editor?”—breathe easy. You don’t. This article gives you the roadmap so you too can create active content in the Edovo Editor.
From setting up content cards to publishing your final lesson, we’ll walk you through every tool, button, and best practice you need to know. Built with adult learning theory, trauma-informed design, and tablet functionality in mind, this guide helps you make structure your secret weapon.
Your cheat sheet for this article
The Edovo Editor is where you build active learning materials: courses and interactive resources (not passive learning materials)
Accepted file formats: MP4, MP3, PDF, JPEG and PNG
Accepted file formats for icons: JPEG and PNG, measuring 500px X 500px
Videos must be compressed to Edovo Presets
There is a unique preview process to preview content from the incarcerated learners’ perspective
Before you start, make sure you’ve got the goods:
Countersigned agreements from the Edovo Content Team
Your username
Your password
If you’re missing any of the above, email content@edovo.org and we’ll help you out.
Want to upload a stand-alone resource (aka passive learning experiences) rather than active learning content? Check out this article.
Uploading active learning content roadmap
Whether you’re designing a course or an interactive resource, these formats invite learners to go one step further, engaging with multimedia content, reflecting on prompts, or answering multiple choice, Likert, fill-in-the-blank, or true/false questions.
It’s not about replacing passive learning, it’s about creating moments for learners to respond, reflect, and apply what they’ve taken in. Active learning doesn’t mean more important—it just means more involved.
This article provides a step-by-step breakdown of the entire process to build, preview, edit, and publish your active learning content. The image below provides an overview of everything we’ll cover in this article.
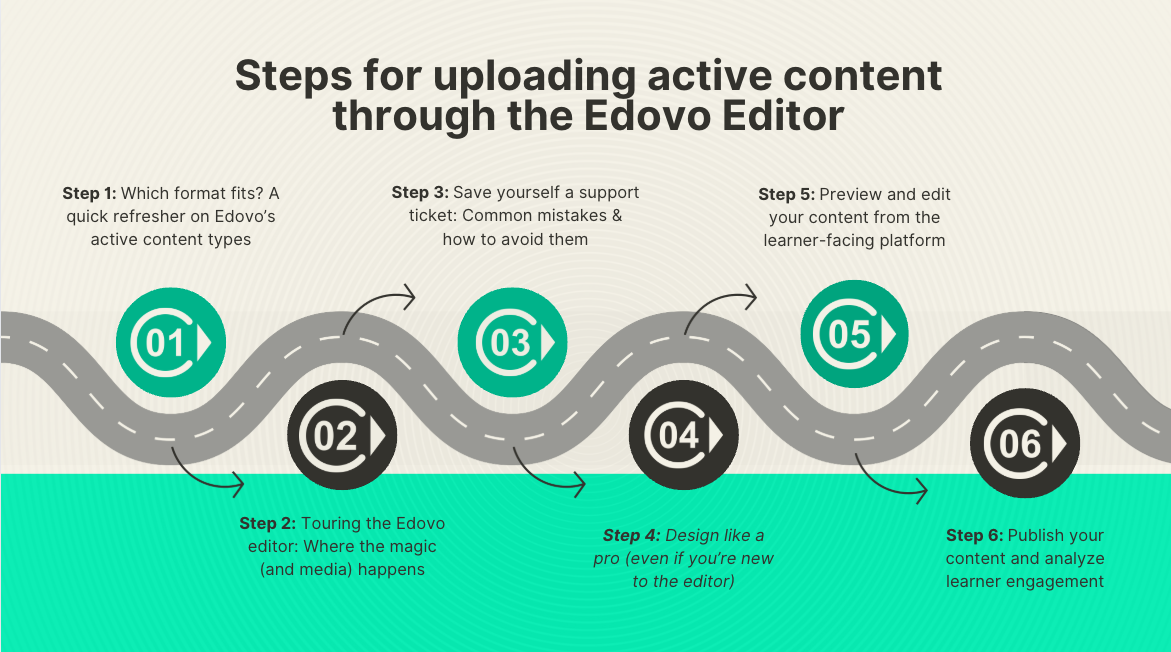
Step 1: Which format fits? A Quick refresher on Edovo’s active content types
On Edovo, everything you build inside the Editor is considered active content. No matter how many lessons/sections you plug into a course or interactive resource, they're each considered an “item,” and they all invite learners to do something—not just passively read or watch.
Which one should you use?
Start with your goal.
Ask: “What do I want my Learner to walk away with—and what kind of interaction helps them get there?”
Want them to solely reflect or lightly interact with the content? → Interactive Resource
Want to build knowledge in a structured, scaffolded curriculum with assessments? → Course
If you’re not asking learners to respond in some way—just giving them something to read, watch, or listen to—then you’re working with stand-alone content items, not an item that gets built in the Edovo Editor. (And we’ve got a whole other guide for that.)
Bottom line? The format you choose should serve your intent—and your Learner’s experience.
Step 2: Touring the Edovo Editor: Where the magic (and media) happens
Whether you’re building your first course or your fiftieth, this series of videos, pdfs, and images will show you how to use every feature within the Edovo Editor. You’ll see where to add media, how to embed questions, and get a side of “ohhh, that’s what that button does.” We recommend following the sequence provided, but if you’re looking for a specific tip, feel free to jump around.
In the 4 videos below, we’ll cover how to:
Build your base: Creating a content card
Set up your pages: Layout, tools, and flow
Design your interactions: Quiz & page tools
Enhance the experience: Extras, logic & support
(Look at that…we’re modeling adult learning theory by providing you with choices! Choice = agency = increased motivation and deeper engagement.)
Build Your Base: Creating a Content Card
Give your content a first impression learners won’t scroll past. In this video, we’re setting the foundation: the content card. This is your content’s first impression; its elevator pitch, its dating profile, its digital handshake. Whether you’re building a course or interactive resource, this is where it all begins.
You’ll learn:
How to title and describe your content to make learners want to click "Start"
What makes a great transcript description for parole boards and case managers
How to upload a series icon that says, “I’m polished and professional—and tablet friendly”
Where to edit, duplicate, and un-hide all your brilliant drafts
By the end, your content card will be clean, clear, and totally click-worthy.
Set up your pages: Layout, tools, and flow
Welcome to your creative HQ—aka the Edovo Editor. In this video, we’ll walk you through how to structure your course or interactive resource one page at a time.
In the video below, you’ll learn:
How to add and organize lessons
What all those buttons actually do (no guesswork needed)
How to use building blocks like videos, PDFs, audio, and quizzes
The secret to pacing lessons so learners don’t check out halfway through
Best practices for formatting titles, chunking content, and avoiding overwhelm
We’ll also cover how to keep your content clear, concise, and optimized for a small screen in a noisy environment (because yes, correctional learning has its quirks).
Go ahead and press play below to get started.
Design your interactions: Quiz & page tools
Make your content active, engaging, and purposeful.
Welcome to the fun part—where your content stops just talking at learners and starts talking with them.
In this video, you’ll learn how to:
Turn passive content into interactive learning with quizzes and prompts
Use the right tool for the right job—multiple choice, Likert, open response, and more
Customize grading, feedback, and scoring to match your goals
Create space for reflection, critical thinking, and deeper engagement
Avoid common editing mistakes (yes, the red box of doom will find you)
But first… you’ve got to click that little “play” triangle. Go on, we believe in you. ;)
Enhance the experience: Extras, logic & support
Make your content flexible, thoughtful, and learner-friendly.
In this video, you’ll learn:
How to give learners more choice without losing structure
How to use optional toggles and precondition logic to guide the journey
How to offer content in different formats—and let learners pick
What to do when things go sideways (hello, help center)
Why a little planning now saves a lot of troubleshooting later
You’ve already built the structure. Now it’s time to layer in the good stuff that makes learning personal, responsive, and smooth. You know the drill… press play on the video below (grab your favorite pen and notebook, note-taking is encouraged)
Step 3: Save yourself a support ticket: Common mistakes & how to avoid them
Even the best content creators hit bumps in the road—but most of them? Totally avoidable. In this lesson, we’ll walk through the most common mistakes we see in the Edovo Editor and show you exactly how to steer clear of them. From media upload errors to hyperlink limitations, we’ve got your back with real answers and practical fixes—no guesswork, no wasted time.
The Top Mistakes (And How to Avoid Them)
Before you hit publish, let’s save you some headaches.
In this video, you’ll learn:
The most common content mistakes we see—and how to avoid them
Why your video might not be playing (hint: it’s not personal, it’s formatting)
What happens if you preview media the wrong way
Why separate caption files don’t work, and what to do instead
How to design with learner flow in mind so no one gets lost
What to check before publishing so you don’t have to redo your whole course
We’ve seen it all. And we’re here to help you skip the pitfalls and build smooth, frustration-free content from the start. Ready to avoid a support ticket or two (and your time)? In the following video we’ll cover:
Mistake #1: Previewing media in the Editor
Mistake #2: Video upload failing
Mistake #3: Submitting separate caption files
Mistake #4: Trying to link within lessons
Mistake #5: Not understanding how learners engage with content
We’ll also cover the most classic of classic mistakes—the one we all stumble into (yep, even us… more than once). Click play to uncover the #1 Editor “oops” and how to dodge it like it’s last week’s mystery meat in the cafeteria.
Mistake-Proof Your Content Checklist
Before you email us to publish, run through this list to sidestep the most common “wait, what just happened?” moments in the Editor. A few quick checks now can save you from a lot of rework later.
Recap
The best content is intentional—and error-free. By knowing where creators typically trip up, you can skip the stress, streamline your process, and make sure your course is clean, clear, and ready to deliver an excellent Learner experience.
Step 4: Design like a pro (even if you’re new to the Editor)
You’ve got the structure down. You’ve avoided the classic missteps. Now it’s time to take your content from good to great. From film-based course structure to assessment writing, we’ll show you how to apply best practices without getting lost in the weeds.
Building a great course or resource isn’t about dumping everything you know onto a page—it’s about crafting a meaningful experience for your learners. One that’s clear, engaging, and built for brains under pressure.
In attached PDF found below, you’ll learn:
How to start with purpose and explain why it matters
What a strong structure looks like (and why consistency builds trust)
How to turn a passive video or book into an active learning experience
Best practices for pacing, relevance, reflection, and trauma-informed design
Real tips for writing good quiz questions, using video well, and avoiding plagiarism pitfalls
Whether you’re just starting or looking to level up your course design, these tips are your go-to guide for building with care and clarity.
Step 5: Preview and edit your active learning content
Because every great lesson deserves a dress rehearsal
You’ve built something powerful—now it’s time to test it out before learners hit “Start.” In this step, you’ll learn how to preview your active learning content in a secure demo environment, check for errors, and learn how to handle updates the right way. A few simple steps now can save learners from confusion later (and save you from having to redo your work).
Your cheat sheet for this step
Duplicate your course and label it clearly for preview
Use our demo environment to test how it appears on a Learner’s device
Don’t forget to check for red warning boxes—those mean “fix me!”
If you need to make changes—big or small—you’ll need to duplicate the original, edit the new version, and submit it as a brand-new item for publishing.
Live materials can’t be edited directly. This ensures a stable experience for learners and preserves the integrity of progress data. It’s not impossible—but it is a process.
Step 6: Publish your content and analyze learner engagement
You’ve previewed, edited, and finalized your course—now it’s time to hit publish and get your work in front of learners!
To publish your content, just email content@edovo.org with the following details:
The final title of your course or resource
The list of facilities where you'd like it published
(If you want national reach, just say “all facilities.”)
What happens next:
You’ll receive a confirmation email when your content is in our publishing queue
Once it clears final screening, review, and is officially published, you’ll receive a second confirmation email letting you know it’s live
That email will also include a link to your Data Analytics Dashboard, where you can track learner engagement and impact
Publishing on Edovo means your content is now available—directly on secure tablets—to incarcerated learners across the country!
TL;DR
You don’t have to be a tech whiz or a senior instructional designer to build great content on Edovo—but it helps to think like one. By using clear structure, thoughtful pacing, and engaging tools, you can turn your expertise into transformational learning that works—on tablets, in facilities, and for justice-impacted adults who deserve second chances done right.
You don’t have to go it alone.
We’ve helped national brands such as LinkedIn, MasterClass, and Grow with Google, and grassroots leaders alike turn great ideas into transformative, tablet-ready learning. Want that kind of backup? Read our Professional Services article to see how we can help.
Related Articles
(FOR CONTENT PROVIDERS) How to build active content in the Edovo Editor - courses and interactive resources
How to build active content in the Edovo Editor (courses and interactive resources) Wondering, “Do I need to be a coder to use the Editor?”—breathe easy. You don’t. This article gives you the roadmap so you too can create active content in the Edovo ...(FOR CONTENT PROVIDERS) Save yourself a support ticket: Common mistakes & how to avoid them
Learn how to build, preview, edit, and publish courses and interactive resources onto Edovo Wondering, “Do I need to be a coder to use the Editor?”—breathe easy. You don’t. This article gives you the roadmap so you too can create active content in ...(FOR CONTENT PROVIDERS) A closer look at what an interactive resource is...and is not
A flexible, lightweight way to create active learning experiences without building a full course. Your cheat sheet for this article: Interactive Resources are short-form, active learning experiences. Built in the Edovo Editor and includes one or more ...(FOR CONTENT PROVIDERS) A closer look at what a course is...and is not
You’ve heard it before: “This could be a course!” But… could it really? On Edovo, “course” means something specific—and powerful. Before you start building, let’s get clear on what a course is (and what it’s definitely not). Your cheat sheet for this ...(FOR CONTENT PROVIDERS) Now Available: Preview Content in Editor
Skip the Ticket: Preview your content directly in Edovo Editor! Creating high-quality content for learners just got easier. With the new preview feature, you can see your courses and resources exactly as learners will while you're still building ...